
Custom Assets
- Custom Assets
The Doxygen pages are here
Executive Summary
Custom assets are all about decoupling. They are project resources that contain data and code wrapped in a Unity ScriptableObject. They provide emitters to signal change and persistence between sessions. Read the list of benefits here and watch the video introduction here.
I have chosen to use this executive summary to provide examples of how you can use custom assets.
Decoupling Components
After you create a custom asset in the project, any reference in components is to the same object. Our example is the ubiquitous player health - a value between zero and one that needs to be accessed by components to:
- display a health bar on the screen
- show health percentages on a status page
- trigger death animation on reaching zero
- be reduced by damage (hit, poison, fall)
- be increased by time, potions, med-kits.
- be reviewed by other actions (such as no jumping on low health)
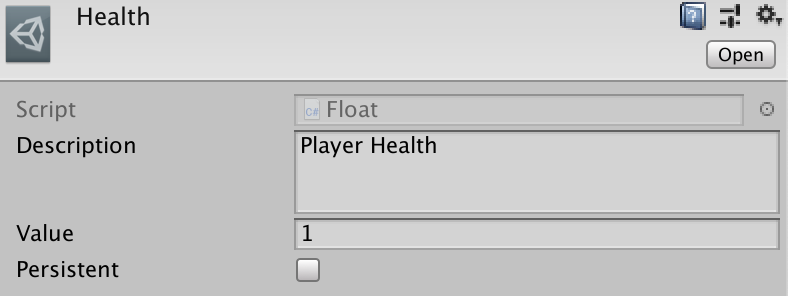
- In this example a CustomAsset.Float project resource does the job while markedly reducing the amount of code and support compared to a singleton.
See how easy it is to create here e in this short video including testing framework. Use the same techniques for stamina, mana, progress and the many other measures used in games. Then branch out to more uses.
Game Managers
The traditional approach of using a MonoBehaviour as a manager creates a system that is difficult to test in isolation. Here we have a video on creating the framework for a health manager using custom assets. Go here if you prefer to read.
Refactoring existing code into custom asset managers can be done in very little time while providing benefits in stability, flexibility and testing. Here is a non-trivial example from existing code.
Persistent Storage
Every mutable custom asset includes a checkbox in the inspector for persistent storage. Data saves when changed and restored on program restart.
Read the code in the Examples Folder and run the Example scene
Videos
- A Health System Example
- Converting a Game Manager to Custom Assets
Cheat Sheet
- Manager: Basic custom asset. Loaded in Managers game object or with Manager.Load for testing
Mutable Custom Assets
Entries can be changed and listeners can register to react to the change.
- AudioClips - AudioClipSet where list of clips can be modified
- Boolean
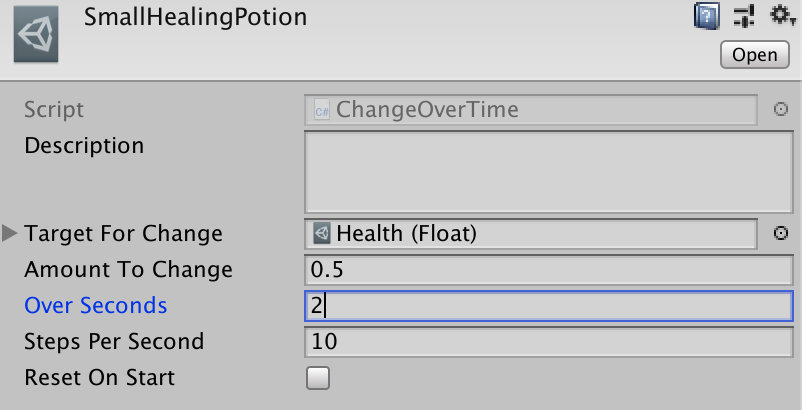
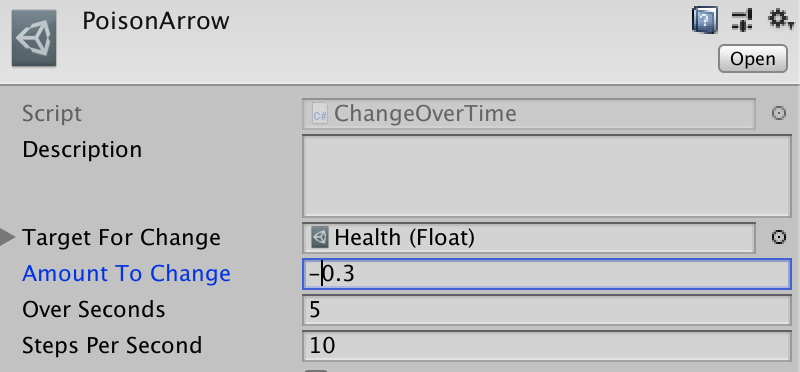
- ChangeOverTime - Given a Float custom asset, change it’s slowly
- Field - Static helper class for setting fields in a compound custom assets
- Float
- GameObject - Use with connector to access a game object from a custom asset
- Integer
- OfType - Base mutable providing emitter and persistence activities
- String
- StringSet - List of strings with picker
- Trigger - Fired on command instead of on change
Constant Custom Assets
- AudioClips - Pick from AudioClipSet
- AudioClipSet - Picker for clip, volume, pitch and distance
- Base - Base class for all custom assets
- Boolean
- Enumeration - Subclass to define set
- Float
- Integer
- OfType - Base class for all constant custom assets
- Quotes - Pick a quote from a QuoteSet
- QuoteSet - Quotes container loaded from text assets
- String
- StringSet - Set of strings when Enumeration is too heavy duty
Connectors
- Animator - Given the parameter name, trigger or set bool, int or float animation control.
- GameObject - give access to a game object from a custom asset
- RectTransform - access/update position and anchors
- Transform - access/update size and scale
Drivers
- Boolean - for boolean unity events
- Driver - Register and deregister the listener with the channel
- Integer - for integer unity events
- NamedBoolean - driver for named events used in the animator
- NamedFloat - driver for named events used in the animator
- NamedInteger - driver for named events used in the animator
- NamedString - driver for named events used in the animator
- NamedTrigger - driver for named events used in the animator
- String - for string unity events
- Trigger - for action trigger unity events
Introduction
Unity provides a base class called ScriptableObject. Derive from them to create objects or assets that don’t need to be attached to game objects.
In short, a ScriptableObject is a class that contains serialisable data and functionality. Each instance of a class that derives from ScriptableObject has representation on disk as an asset. Each asset is a source for data and actions not coupled to a scene. The decoupling makes for functionality that is easy to test. It also provides modules to be shared across and between projects.
Custom assets are Unity scriptable objects on steroids. They provide the glue that allows you to piece together a better game.
- Better than singletons
- Share information across scenes, game objects and components; and
- Seed it as a resource in the project; and
- Have it made read-only, read/write and even persistent; and
- Drive components directly without additional code; and
- Add a description to each custom asset to clarify usage; and
- Attach to existing components to provide dynamic action without code 1. Start and stop animations with a trigger, boolean, integer or float custom asset; or 2. Control canvas groups, image fill or text field content with float and string custom assets
- Packaged with many useful standard custom assets
- Boolean - where components can react to a change of state
- Integer - that can be changed by code or visual slider
- Float - components can react and/or display results on value change
- String - for display or detailed action control
- StringSet - provides a more powerful and flexible alternative to enums
- Trigger - an emitter where components can attach as needed without additional code
- Polling - to provide custom asset triggers for external data changes
- AudioClips - allowing random selection from a set of audio clips with variations in volume, pitch and distance to provide a better audio experience for your players
- Quotes - Load and retrieve text from within the component or other text resource files either randomly or in sequence. Good for quotes, jokes, game hints or news feeds.
- Create your custom assets with any serialisable data and optional supporting scripts
- Every custom asset has a dictionary of members to save more than one copy of data - accessed by name.
Custom Assets - the new Singleton
Static variables are not evil, just inflexible. Singleton MonoBehaviour instances are not corrupt either. However, both encourage tight coupling between interested parties.
So now for a bit of mild blasphemy. Assets created from scriptable objects, and hence custom assets are Unity supported singletons. Create [SerializeField] fields and drag an asset of the correct type onto them in the editor. All reference to the same in-memory instance.
Using custom assets over traditional singletons provide some benefits:
- Code is less coupled - or is that more decoupled?
- Custom assets can be tested in isolation.
- Alternative custom assets can be injected into objects that are expecting them. An inventory may depend on location or whether the player is in training mode.
- It is less error prone to pass custom assets between scenes and projects.
- Functionality can be more generalised for direct reuse from within the editor without writing as much scaffolding code. A
Floatcustom asset, for example, can have components that hook into display objects. Sliders and scroll-bars can also update it without additional code by adding it to the On Value Changed field. - A custom asset as a singleton to hold game data has one massive failing. There is one copy only. If you want to store player health for an unknown number of players, how do we save it? For this, custom assets have the concept of members. Each named entry holds a reference to the custom asset storage that can be accessed by member name.
Custom Assets as Game Managers
Managers are a favourite Unity pattern. As well as a system-wide master manager, many games have them for player, enemies, sound and more. They have some standard features:
- They are accessed by a static
Instancevariable. - They are a MonoBehaviour that sets
InstanceinAwake(). - They call
DontDestroyOnLoad(gameObject)if they are to be common across scenes. - There is often one manager to rule them all.
It is not uncommon to see code like:
health = GameManager.Instance.PlayerManager.MaxHealth;
Try testing that component in isolation.
By contrast, a custom asset approach would be more like:
[SerializeField] maxHealth;
...
health = maxHealth;
Manager custom assets are the most useful when decoupled. They deal with data custom assets by making changes and responding to events. This manager can be tested in isolation without loading the complete game. Test in concert with the HealthManager and the HitManager for more complex scenarios.
  [CreateAssetMenu(menuName = "Managers/Armor"), Serializable]
  public class ArmorManager : Manager {
    [SerializeField] private Float armorStrength = default;
    [SerializeField] private Float hitAmount = default;
    [SerializeField] private Float health = default;
    [SerializeField] private Float armorDegradation = default;

    protected override void Initialise() => hitAmount.Emitter.Subscribe(OnHit);

    private void OnHit() {
      // the stronger the armor the less a hit will do damage
      var adjustedHit = hitAmount * (1.0f - armorStrength);
      health.value -= adjustedHit;
      // But eac hit damages the armor a little
      armorStrength -= hitAmount * armorDegradation;
    }
  }
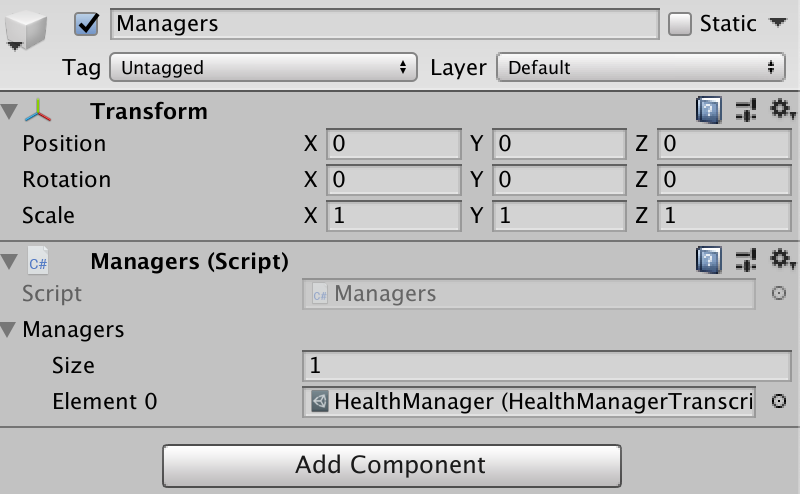
Manager Loading
Player managers should be logic. Data have their custom assets. Since managers only react to events, they need to be explicitly loaded. In the Unity editor select the menu GameObject // Create Managers. Drag the managers into the list in the newly created MonoBehaviour.
For testing, we don’t need a scene — another benefit of decoupling. Manager provides a Load method for independent testing. The asset can be found by name with or without a path. Only as much of the path as needed for uniqueness needs be given.
  public class HealthManagerTest : PlayModeTests {
    [UnityTest, Timeout(100000)] public IEnumerator HealthManager() {
      //- Our health component will take 1,000 seconds to go from zero to full. Let's speed things up by 10x
      Time.timeScale = 10;
      try {
        //- We don't need a specific scene, just load the custom assets
        Manager.Load<HealthManagerTranscript>("HealthManager.asset");
        var health = Manager.Load<Float>("Health.asset");
        health.Set(0);
        //- Timeout attribute will cause a test failure after 10 seconds
        while (true) {
          //- This causes a 1/10th of a second delay due to the modified scale
          yield return new WaitForSeconds(1.0f);
          //- Leaving once the test passes is a successful result. This should take 1 second at the current time scale.
          if (health >= 0.01f) yield break;
        }
      } finally {
        Time.timeScale = 1;
      }
    }
  }
Custom Assets as Configuration
The most common use for scriptable objects is to ignore the scriptable part and use them as configuration containers. A Custom Asset is a file within the project. This file contains a reference to the script and serialised copies of all the data as added in the Unity editor.
You can safeguard the serialisable data by making it a private [SerializeField] and using accessors to allow reading. Alternatively, you can use them as seed data and change them during program execution.
class MyData : CustomAsset {
[SerializeField] private int maxHealth;
[SerializeField] private float timeOfDay;

// maxHealth cannot be changed outside this class
public int MaxHealth { get { return maxHealth; } };
// timeOfDay can be updated
public float TimeOfDay { get { return timeOfDay; } set { timeOfDay = value; } };
Later I will introduce better and more granular ways to handle data.
Read-only Custom Assets
The custom asset inspector allows a designer to mark the asset read-only For serialisable classes as values, protection of internal data is still code bases. Make the fields private and serialisable so that the editor can change them. Then use accessors without set to only allow for reading. If you can’t trust the code accessing data in a complex object graph, either clone the custom asset or lock down access at all levels.
var clone = Object.Instantiate(myCustomAsset).Value;
Cloning is much more expensive at runtime than baking in protection during the compile phase.
Custom Assets and Persistence
Custom Assets adds optional persistence to scriptable objects. Persistent assets must be read/write and have the persistent field set in the Unity Editor.
Each persistent object is serialised to JSON and written as a PlayerPref entity. For this reason, the total storage is about one megabyte. For more massive storage needs, use a database.
The key is made up of the name of the asset and the class name, making it unique to the application.
Set persistence from the Unity inspector or code.
myAsset.Persistence = true;
Benefits
- Allows complete decoupling of components and groups of components, data from logic and logic from the rest of the Unity framework. It provides for a modular system that is more stable, easier to maintain and infinitely more testable.
- Using custom assets as data containers allow for all vital information to be editable in the Unity inspector, both for game creation and Editor run-mode testing.
- Problems can be isolated to integrity tests against one or more manager custom assets without having to run up a complete system.
- All custom assets provide an implementation of the observer pattern. Changes can trigger logic in managers which can trickle up to visual changes at the Unity level.
- Custom assets can be made to persist so that changes made in one session reload in the next session. The next release extends persistence to cloud storage.
- Connectors are game object components that allow you to drive other components directly from custom asset data. Currently, there are connectors for a GameObject instance directly, Animator, Transform and RectTransform components.
- Drivers are game object components that, given a data custom asset can call a public setter on other components on the game object. Many game objects provide public setters while others need a connector to be accessible.
Accessing Custom Assets
A custom asset is like any other Unity asset. Create a field for it in a MonoBehaviour or other CustomAsset class and drop in the reference.
public sealed class CustomAssetsExample: MonoBehaviour {
  [SerializeField] private Float             maxFloat;
  [SerializeField] private Float             currentFloat;
  // ...
}
Custom assets aid decoupling. Many components can operate without directly knowing each other.
Access custom asset values by either casting or using the Value getter. ToString() will aways call ToString() on the Value field.
Debug.LogFormat("{0} == {1}",maxFloat.Value, ((float) maxFloat);
Debug.LogFormat("{0} == {1}",maxFloat.Value.ToString(), maxFloat.ToString());
Instance
There is a second way. As long as a custom asset is referenced as above at least once, it is available with code access elsewhere.
Float lifetime = Float.Instance("Lifetime");
UniqueAsset = UniqueAsset.Instance(); // "UniqueAsset" name optional
The static Instance method is also useful for in-memory custom “assets”. The first call creates a copy while other calls retrieve a reference. You can even keep the value between invocations of the game by setting persistence.
lifetime.Persistence = true;
Creating Custom Assets
Custom Assets are ScriptableObjects serialised and written to disk as an asset in the project.
%YAML 1.1
%TAG !u! tag:unity3d.com,2011:
--- !u!114 & 11400000
MonoBehaviour:
m_ObjectHideFlags: 32
m_PrefabParentObject: {fileID: 0}
m_PrefabInternal: {fileID: 0}
m_GameObject: {fileID: 0}
m_Enabled: 1
m_EditorHideFlags: 0
m_Script: {fileID: 11500000, guid: 22f206729bb7e417e9b12649707e941e, type: 3}
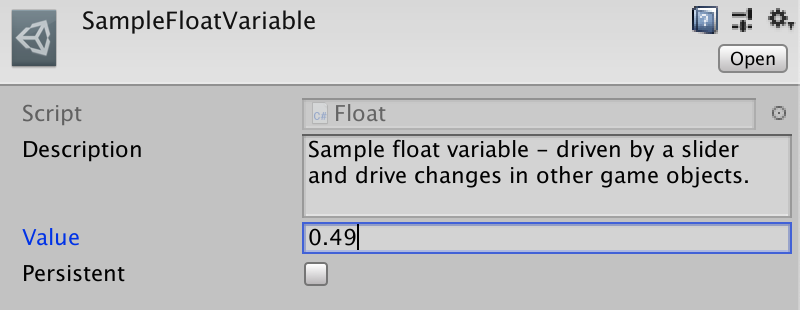
m_Name: SampleFloatVariable
m_EditorClassIdentifier:
Description:
value: 0
readWrite: 1
persistent: 0
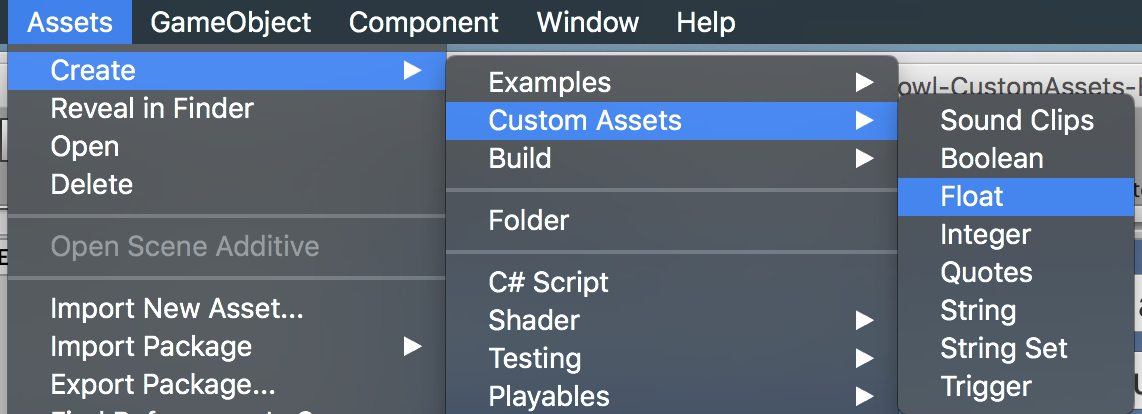
Each custom asset type has an entry on the Create / CustomAssets / asset name. Use it, select the resulting file and fill in the fields. If you want to load it from disk using Resources.Load(pathFromResources) you will need to place it in a Resources folder.
OfType{T}
CustomAsset.OfType<T> is the base type for all custom assets except Trigger. Functionality includes being able to register events on change, persistence and some read-only protection.
[CreateAssetMenu(menuName = "Examples/LargerAssetSample")]
public class LargerAssetSample : CustomAsset.OfType<LargerAssetContents> { }

[Serializable]
  public class LargerAssetContents {
    public int    Order;
    public float  Limit;
    public string Name;
  }
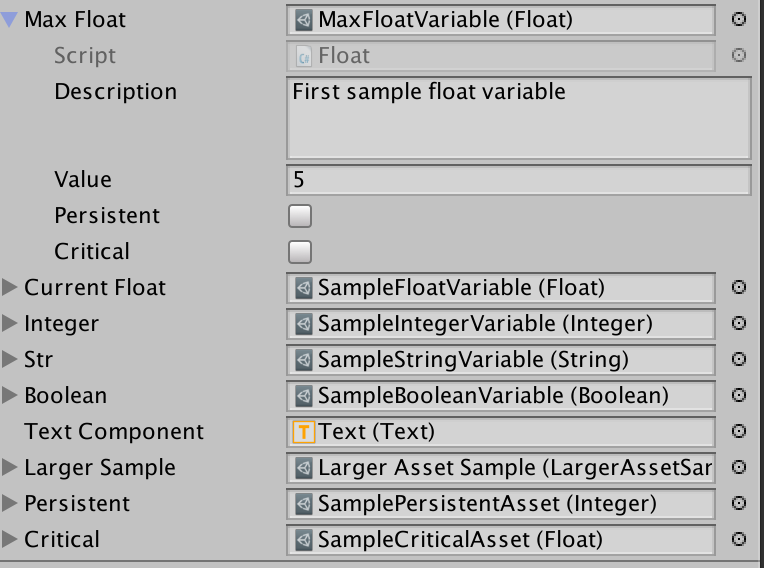
All CustomAsset instances have a description field. Since you can use generic assets, it is useful to give others comments on what specific assets represent.
Primitive Custom Assets
  [SerializeField] private Float             currentFloat;
  [SerializeField] private Integer           integer;
  [SerializeField] private String            str;
  [SerializeField] private Boolean           boolean;
Each if these custom assets can be in a project with or without supporting code. It is possible, for example, to have a Float value set in the On Value Changed field of a Slider or Scrollbar, then displayed using a driver like CustomAsset.FloatDriver to set the fill amount on a health bar Image component.
Float
The mutable Float custom asset also includes a range set in the inspector. Attempts to change the value outside the limits leave the value at the closest bound. It allows managers to increase or decrease a value without being concerned with going outside acceptable limits.
health += 0.2f;
// is clearer to read than
if (health < 0.8) health += 0.2f;
Set bounds with sliders or text entry. The latter is necessary if you need a value outside the range the sliders are set.
Conditions may require a range change. A tired warrior may not be able to have health over 80%. Use Float.Minimum and Float.Maximum to make the adjustments.
Object (non-primitive) Custom Assets
A class will better represent a more complex custom asset. There are a few boundaries. The class must be serialisable and any members you want to change in the inspector labelled as serialised fields.
  [Serializable] public class LargerAssetContents {
    public int I;
    public float F;
    public string S;
  }
Take care while setting fields. The static CustomAsset.Mutable.Field class provides helpers for float, double, int, long, bool, string, Vector2, Vector3, Vector4 and Quaternion types. There is also a generic form for adding new structs. You need to provide a comparator.
Field.Set(largeAssetContents, ref largeAssetContents.F, 12);

    public static void Set(this WithEmitter asset, ref Vector4 field, Vector4 from) =>
      asset.Set(ref field, from, (a, b) => a == b);
Enumeration
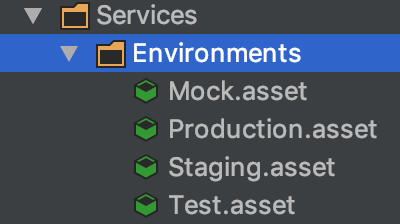
Rather than use the c# language element enum, consider using an Enumeration custom asset. Using the Decoupler service environment as an example, we create it by sub-classing Enumeration.
[CreateAssetMenu(menuName = "Decoupler/Environment")]
public class Environment : Enumeration { }
Now, use the menu to create as many environment elements as you need.
Create a serialisable field CustomAsset or MonoBehaviour that intends to use the enumeration.
[Serializable] public class Context : Base {
  [SerializeField] private Environment environment = default;

  protected virtual bool Equals(Context other) =>
    base.Equals(other) && Equals(environment, other.environment);

  public override int GetHashCode() {
    unchecked { return (base.GetHashCode() * 397) ^ (environment != null ? environment.GetHashCode() : 0); }
  }
}
In this example, different services sub-class context and add additional fields. A common one is platform, allowing different service implementations for iOS, Android, Steam, and others.
During initialisation, the service manager decides which service are from the given current context.
var useful = services.Where(service => service.context.Equals(context) && service.IsExternalServiceAvailable());
Trigger
A trigger is unusual in that it does not have any data apart from CustomAsset requirements. Triggers do not have persistence, so a subclass containing data cannot be saved.
Members
A custom asset with any content data also can store and retrieve separate copies by name. For persistent custom assets, the member names and values saved to storage along with the main value.
[SerializeField] CustomAsset.Integer myInt;
// ...
myInt.Value = 22;
myInt["One"] = 1;
myInt["Two"] = 2;

string[] names = myInt.MemberNames;
Assert.AreEqual(names.Length, 2);

Assert.AreEqual(myInt["One"], 1);
Assert.AreEqual(myInt.ToStringForMember("One"), "1");
Assert.True(myInt.Contains("One"));

myInt.Remove("One");
Assert.False(myInt.Contains("One"));

Assert.True(myInt.Contains("Two"));
myInt.Clear();
Assert.False(myInt.Contains("Two"));
ToStringForMember requires special mention as it can be use in Inspector event receivers to set values directly.
AudioClips
Playing one from a selection of audio clips have been a well-used proof of concept for ScriptableObject. Because custom assets, sets and some other toys from this package make the implementation even simpler, I am displaying the source here.
  [CreateAssetMenu(menuName = "Custom Assets/Sound Clips", fileName = "Clips")]
  public sealed class AudioClips : Set<AudioClip> {
    [SerializeField, Header("Audio")]     private Range volume   = new Range(1, 1);
    [SerializeField, RangeBounds(0, 2)]   private Range pitch    = new Range(1, 2);
    [SerializeField, RangeBounds(0, 999)] private Range distance = new Range(1, 999);

    public void Play(AudioSource source) {
      source.clip        = Pick();
      source.pitch       = pitch.Pick();
      source.volume      = volume.Pick();
      source.minDistance = distance.Min;
      source.maxDistance = distance.Max;
      source.Play();
    }
  }
Range class and RangeBound attribute are available in the custom assets package. AudioClips will work without them, but sliders are easier to use.
The actor, Play, requires an AudioSource. An audio source must be attached to the game object that is to make a sound so that it comes from the correct source. It cannot be part of a custom asset which is not a component.
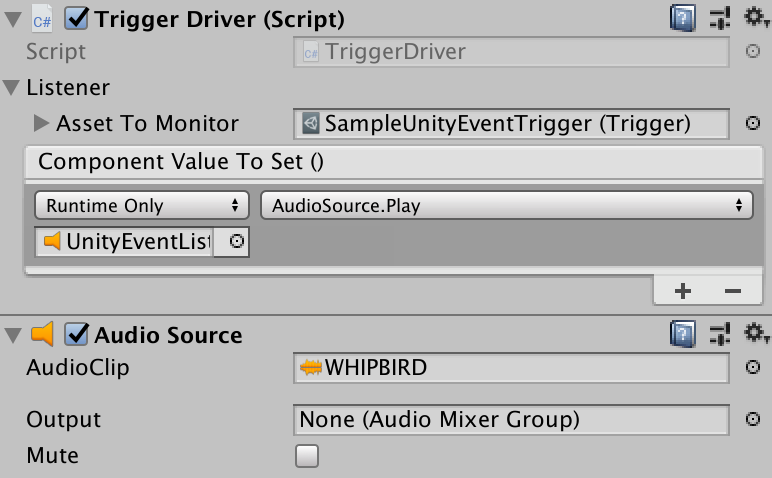
Fortunately, the Unity framework has a solution to that problem. It is called UnityEvent.
  [SerializeField] private AudioClips audioClips;
  [SerializeField] private UnityEvent audioClipsEvent;
will display in the inspector as follows.

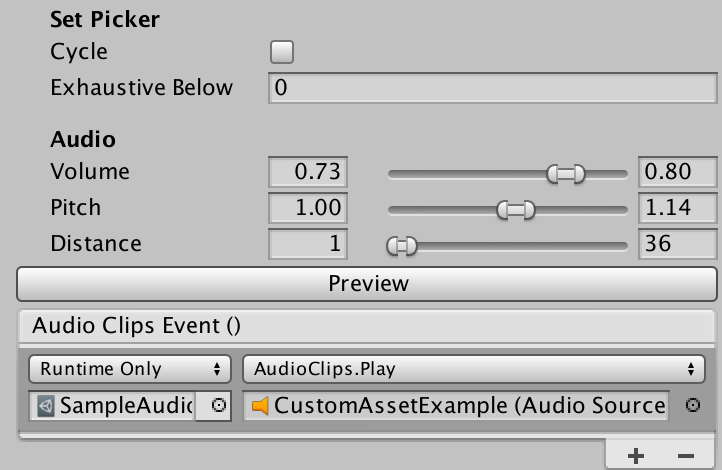
The reference to AudioClips is optional. It is only there so that we can change the fields in the editor without going to the asset.
If you are calling Play from code, then you can supply an AudioSource or a game object that has an audio source component.
  [SerializeField] private AudioClips audioClips;
  void Play() { audioClips.Play(gameObject); }
  void Play1() { audioClips.Play(GetComponent<AudioSource>(); }
Using AudioClips wherever you have sound effects makes your game sound a lot more lively. You could also consider making similar assets for visual effects or animations.
ChangeOverTime
It is always fun to factor out common manager custom assets into common code. Health, mana, stamina and similar look better if changes are not instantaneous. Moreover, some, like poison, have to happen over a period. Create managers without code using the ChangeOverTime custom asset.
Custom Asset Sets
Set, like OfType is a generic class. To instantiate it requires the type of set entries.
[CreateAssetMenu(menuName = "Examples/SetPicker", fileName = "SetPickerSample")]
public sealed class SetPickerSample : Set<AudioClip> {
  public void Play() { AudioSource.PlayClipAtPoint(clip: Pick(), position: Vector3.zero); }
}
This example can be used to play one of a selection of sounds. This is a great way to make a game sound less tedious.
Pick()
All classes inheriting from Set have a Pick() method with two controlling field entries:
- cycle: True to return entries sequentially, false to get a random selection.
- exhaustiveBelow: If the number of entries in the set is below this value, then while
Pick()returns a random entry, no entry is retrieved twice before all the others have had a turn. From a list of three, nothing appears random.
These options are available in the editor when you create a custom asset from a Set.
Add(entry)
While in most cases the Set will be filled by the Unity Editor to save as an Asset, there are occasions where adding additional elements will be needed.
Remove(entry)
On occasions, a Set entry will expire, and it will be necessary to remove them.
Contains(entry)
See if a Set contains a specific entry.
Count
Retrieve the number of entries in a set.
ForEach
Call an action for every entry in a set. If the action returns false, all is complete.
mySet.ForEach((s) => {return s!="Exit";});
StringSet
Strings as a set have many usages. Quotes is an implementation of StringSet.
Editing Custom Assets
Serialised fields can be edited in the Unity Inspector just as you would a MonoBehaviour attached to a game object. Unlike a scriptable object, custom assets unload when play mode completes. In this way, they behave more like MonoBehaviours. There is a reason for this madness. In the Unity editor, scriptable objects remain loaded and only reload if the backing code or asset changes on disk. If we don’t reset on leaving play mode, changed data from one run lives to the next.
Custom Assets as Resources
If you can accept the tighter coupling, you can load custom assets my name. It is an alternative to dropping them into referring fields in the Unity inspector. The custom asset must reside in a directory under a Resources path - anywhere in the project.
// expects /anywhere-in-assets/Resources/Audio/cow-sounds.asset
var moos = Resources.Load<AudioClips>("Audio/cow-sounds");
Custom Assets as Event Sources
The first significant departure from ScriptableObject that CustomAsset provides is the ability to act as an event source.
Primitive custom assets (trigger, boolean, integer, float and string) are extremely easy to use. Drag a reference using the Unity editor into any MonoBehaviour or CustomEvent that needs to access or update them.
Drivers and Connectors (described below) also need a reference. They register for changing events. The event fires when and only when the custom asset changes.
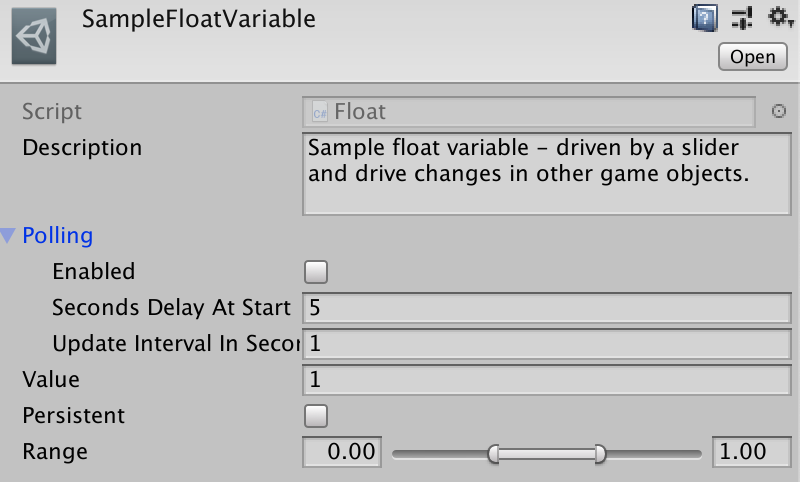
Polling
No matter how hard we try there is data that changes, and we cannot be informed promptly. The technique of last resort is called polling - where we check periodically for change. The inspector for any mutable custom asset includes some polling fields. Just enable polling in the inspector and set the intervals.
Using Custom Assets
Life begins now. Without writing any code, you can use the prepackaged custom assets and listeners to connect components without them knowing about each other.
Don’t believe me? Create a game object inside a canvas and add a slider component.
Step 1: Create a Float custom asset from the Unity editor main or context menu.
Step 2: Select the custom asset and add any initial data.
Step 3: Create a new GameObject in the Unity Hierarchy window. Make sure it is inside a Canvas GameObject.

Step 4: Go to the inspector for the game object Slider and add a slider component.
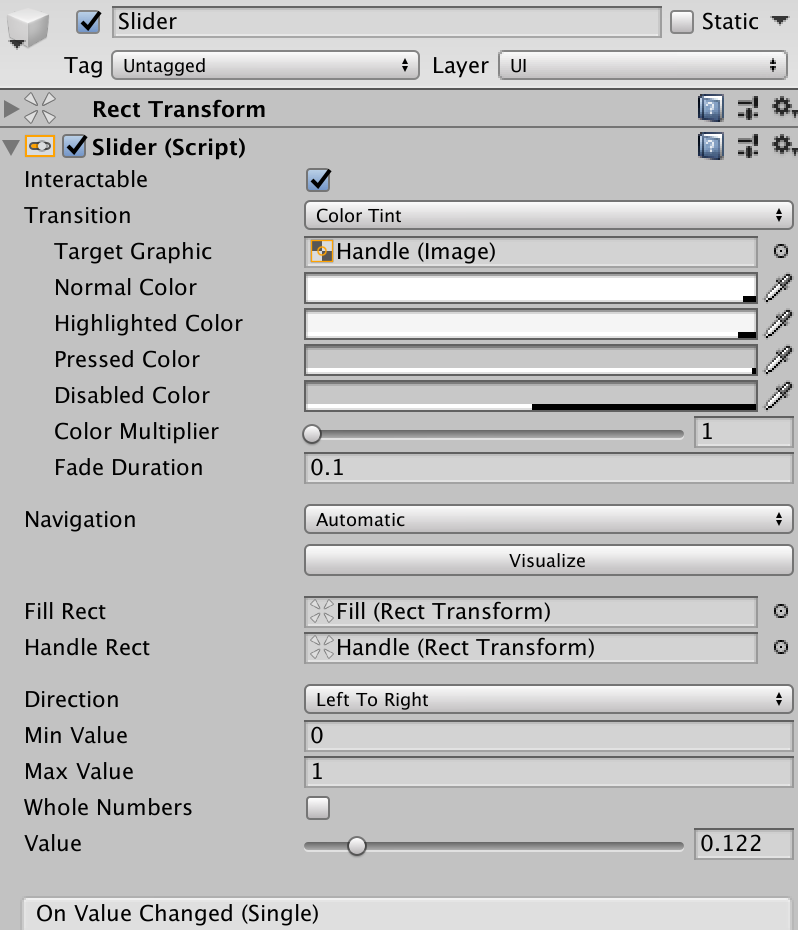
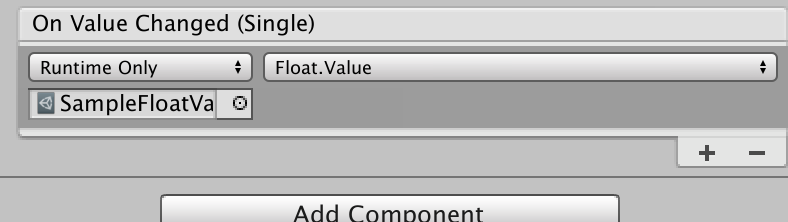
Step 5: Add an On Value Change field and drag the Float custom asset into the associated field. Use the function drop-down to select Float: Value.
Step 6: Lock the inspector on the Float custom asset and run the scene. Drag the slider and watch the value change in the inspector.

For extra points, we can create a code-less health display bar.
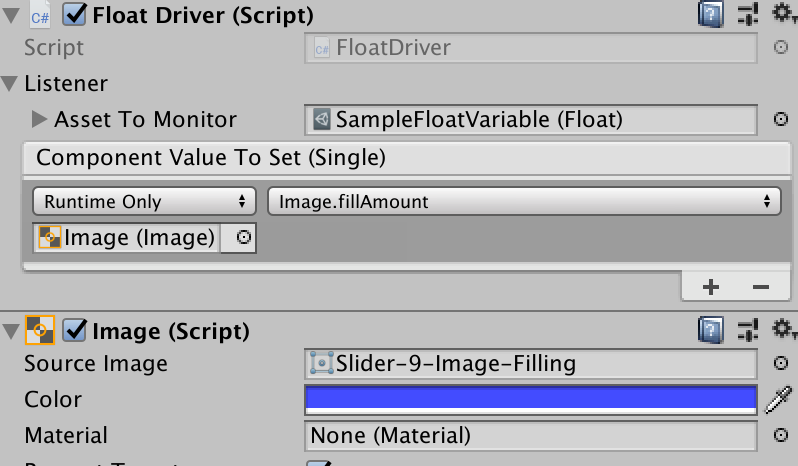
Step 7: Create a UI Button GameObject in a Canvas and change the image type to Filled. Note that moving the Fill Amount slider causes the button to change background proportionately.
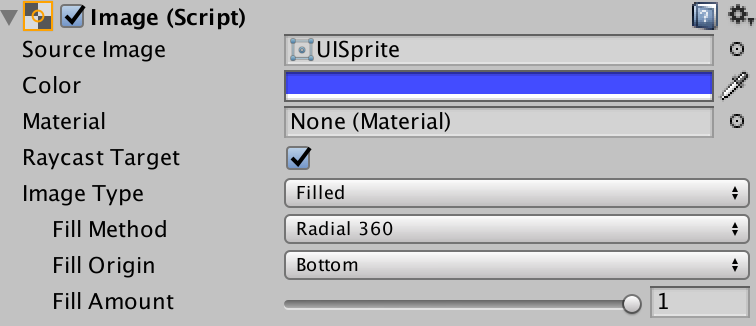
Step 8: Press the Add Component Button then search for and add the FloatDriver component. Set the custom asset to the one created above and the component value setter to Image.FillAmount.
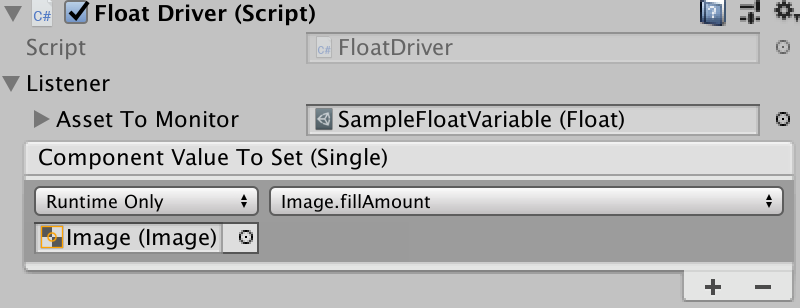
Step 9: Run the application and move the slider created above. The button fills and empties accordingly.

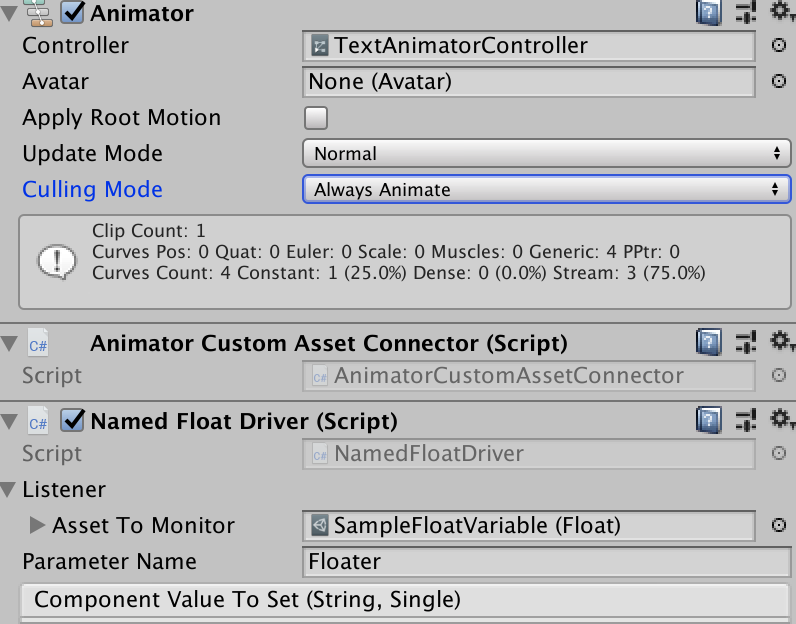
For components, like Animator, with named values Used NamedFloatDriver and it’s siblings.
Referencing CustomAsset Contents
Anywhere you want direct access to a custom asset, create a reference in your MonoBehaviour, CustomAsset or ScriptableObject and assign it in the inspector.
class MyHealthComponent : MonoBehaviour {
  [SerializedField] CustomAsset.Float health;

  private void OnEnable() => health.Value = 1.0F;
}
You can also use the custom access emitter directly to react to change.
  private void HealthChanged() {
    UpdateHealthBar(health.Value);
    if (health.Value <= 0) {
      Fibers.Start.Do(DieAnimation).WaitFor(seconds: 5).Do(ReturnToStartScreen);
    }
  }
  private void Start() => health.Emitter.Subscribe(HealthChanged);
Code-Free CustomAsset Usage
Even the minimalistic code above is unnecessary for many CustomAsset applications with the use of drivers and connectors.
Drivers
A driver is a MonoBehaviour that is designed to listen for custom asset changes and interact with other components of a game object directly. If you are passing information, the method must be in the Dynamic Data section.
Add them to the Inspector view by dragging them in or using the menu Component/CustomAssets/Name of Driver.
Triggers are the exception and can use methods from Static Parameters.
All primitive data drivers have a matching version that starts with Named. These are to drive components like Animator that require a parameter name as well as the value. Since Animator does not expose it’s internals to the Inspector, we need to resort to a connector.
This package provides drivers for all primitive data type, but it is trivial to add new ones.
  public class MyBangDriver : ListenerComponent {
    public Float Asset => Listener.AssetToMonitor as Float;

    [Serializable] private class BangUnityEvent : UnityEvent<Bang> { }

    [SerializeField] private BangUnityEvent componentValueToSet = default;

    protected override void OnChange() =>
      componentValueToSet.Invoke(Asset.Value);

    #if UNITY_EDITOR
    [MenuItem("Component/CustomAssets/Bang Driver")]
    private static void AddConnector() => Selection.activeTransform.gameObject.AddComponent<MyBangDriver>();
    #endif
  }
Of course, you are unlikely to find a Unity component that knows what to do with a Bang object. You would be writing your own or relying on a Connect component (as described below) to distribute a Bang to the rest of the game object.
Connectors
If a component does not expose the data in the Unity inspector, then it is necessary to use a connector. The animator connector used above provides an excellent example.
Add them to the Inspector view by dragging them in or using the menu Component/CustomAssets/Name of Connector.
  public class AnimatorCustomAssetConnector : MonoBehaviour {
    public void SetTrigger(string parameterName) => animator.SetTrigger(parameterName);
    public void SetInteger(string parameterName, int value) => animator.SetInteger(parameterName, value);
    public void SetFloat(string parameterName, float value) => animator.SetFloat(parameterName, value);
    public void SetBoolean(string parameterName, bool value) => animator.SetBool(parameterName, value);

    private Animator animator;

    private void Awake() => animator = GetComponent<Animator>();

    #if UNITY_EDITOR
    [MenuItem("Component/CustomAssets/Animator Connector")]
    private static void AddConnector() => Selection.activeTransform.gameObject.AddComponent<AnimatorCustomAssetConnector>();
    #endif
Most connectors only require the information without a parameter name.
  public class TransformCustomAssetConnector : MonoBehaviour {
    public void ScaleX(float value) =>
      transform.localScale = new Vector3(value, transform.localScale.y, transform.localScale.z);
    // ...
  }
Concrete Component Connectors
The components listed here are part of a growing list of listeners that can be used to minimise coupling and reduce project specific code.
Animator Connector
An animator component relies on an outside source to set a named trigger, integer, float or bool variable. AnimatorCustomAssetConnector exposes all if them. When hooked up to a custom asset you can change the value where the logic is appropriate and the matching animation plays.
RectTransform Connector
RectTransformCustomAssetConnector inherits from TransformCustomAssetConnector and adds the concepts of anchors, width, height, left, right, top, bottom as is appropriate for UI transforms.
TransformConnector
This connector allows for changes to the scale, rotation and position for any gameObject.transform. There is a video linked at the start of this document that uses changes of scale to show/hide a health-bar.
GameObjectConnector
The GameObjectConnector is a bit different. Add it to an existing GameObject with the menu Component/Custom Assets/GameObject Connector* then drop in a custom asset that inherits from CustomAssets.Mutable.GameObject. Now code anywhere can access the game object.
Custom Asset Persistence
If a custom asset is marked persistent in the Inspector, then it writes itself out to the PlayerPref database using a key combining the name and class.
Persistence occurs when the asset’s OnDisable method is called - typically when the operating system has decided to throw the game out of memory.
For primitive assets, any updates happen without further coding.
  Float age;
  age.Value = 32.2f;
For custom assets containing a more complicated class or struct, the creator is responsible for marking changes either directly with Changed() or as part of the update. For the latter, creating accessors in the custom asset provided for clearer calling code that using Value directly - while calling Set on the update informs all listeners.
[CreateAssetMenu(menuName = "Examples/LargerAssetSample")]
public class LargerAssetSample : CustomAsset.OfType<CustomAssetsExample.LargerAssetContents> {
  public int AnInteger { get { return Value.I; } set { Set(() => Value.I = value); } }

  public float AFloat { get { return Value.F; } set { Set(() => Value.F = value); } }

  public string AString { get { return Value.S; } set { Set(() => Value.S = value); } }
}
Quotes
Quotes is a StringSet Custom Asset that if given a list of lines and a TextAsset returns a line using the Pick interface. A quote is formatted as a body of the quote (attribution) where the attribution is optional. The attribution is surrounded in brackets and must be at the end of the line. RTF is acceptable in the quote.
I would recommend setting Exhaustive Below to a figure like 50 or 100. Otherwise shorter lists appear to repeat entries too often.
RTF
RTF is a static function to convert a string quote into RTF format so that the attribution can be in grey. The text between brackets at the end of the line makes up the attribution.
Debug.Log(Quotes.RTF("Life wasn't meant to be easy (George Bernard Shaw)"));
produces “Life wasn’t meant to be easy“ George Bernard Shaw
Examples
Health Bar
- First, create a test scene (menu Assets/Create/Scene)
- Create a CustomAsset to store the health (menu Assets/Create/Custom Assets/Mutable/Float)
- Create a canvas (menu GameObject/UI/Canvas)
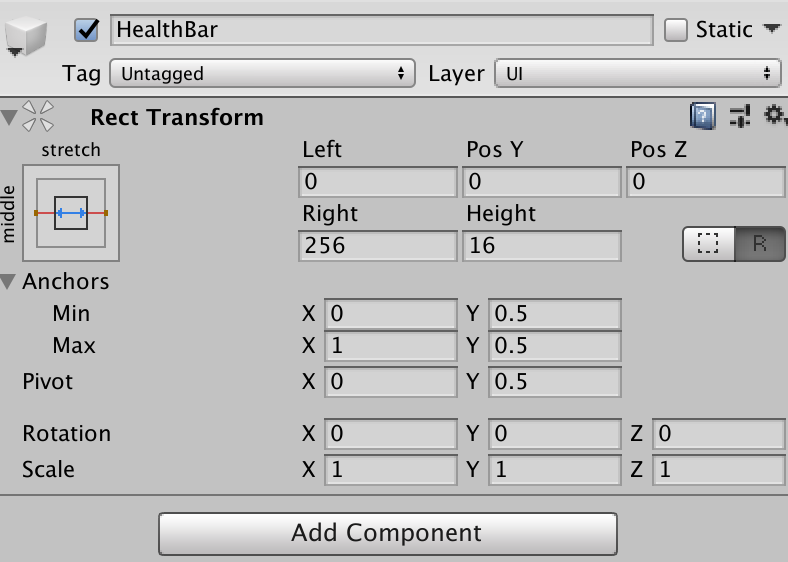
- Create an empty child GameObject and call it HealthBar
- Set it to a reasonable size
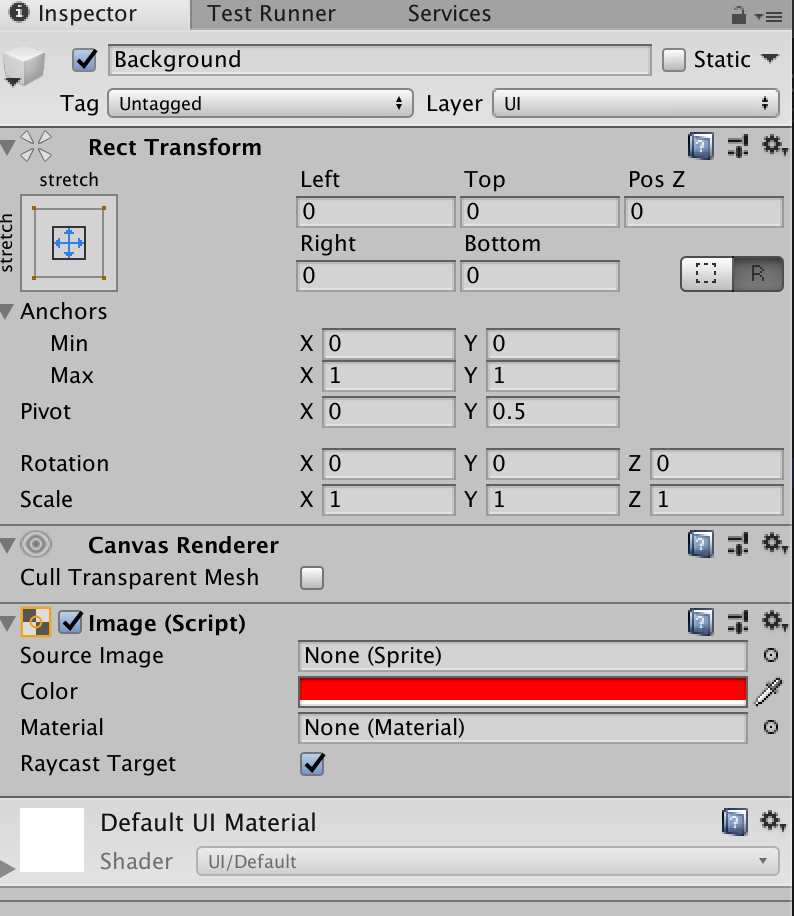
- Create an image child (menu GameObject/UI/Image) and call it Background
- Set colour to red
- Set position and size to 0
- Set X and Y anchors to Min 0, Max 1
- Change X pivot to 0
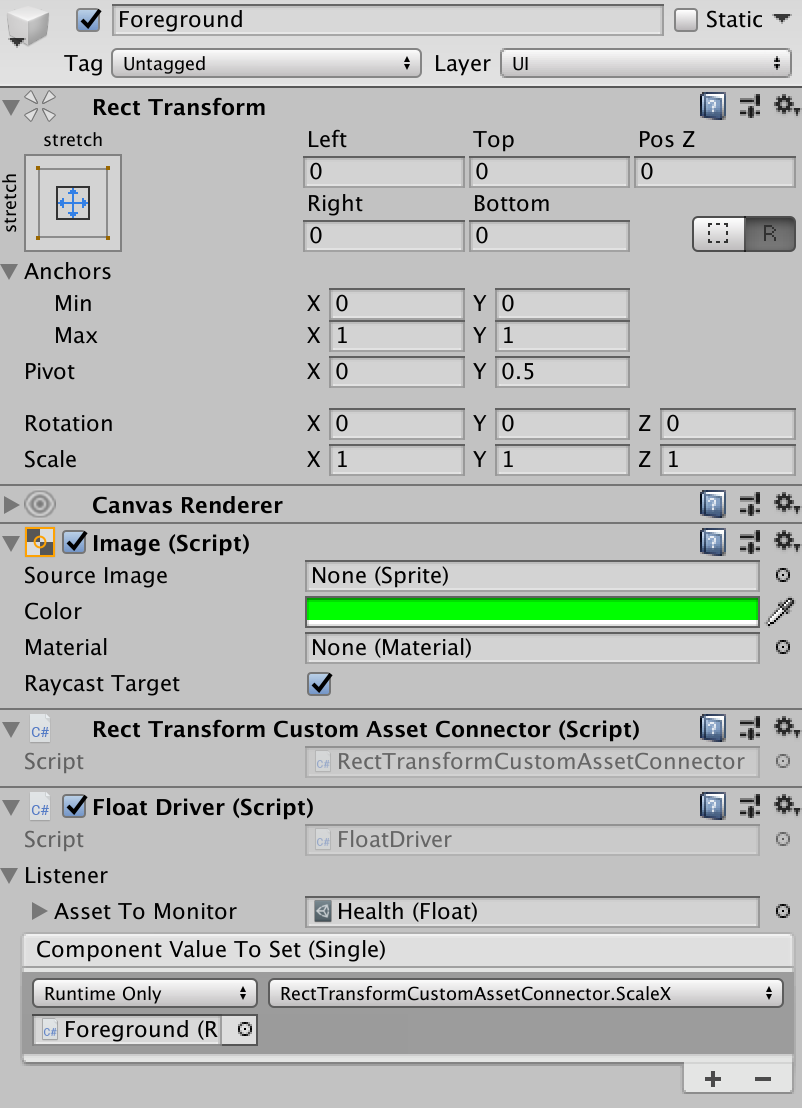
- Duplicate the Background, rename Foreground and change to green
- The foreground is the only active component. We are going to reduce the scale so that the background shows through. Since transforms don’t expose their data, we use a connector. (Drag connector into Inspector)
- And we need a float driver to change the scale when our health custom asset changes (drag Float-Driver into the inspector)
- This is where we hook them up (drop health asset into the driver and set the component to ScaleX)
- We created the health scene for two reasons - so that we can tweak our health bar before adding it to our project and so we can add manual and automatic testing. We need to add a component to drive the health bar. Fortunately, the Unity UI has a slider that works a treat. (Bounds//context//UI//Slider)
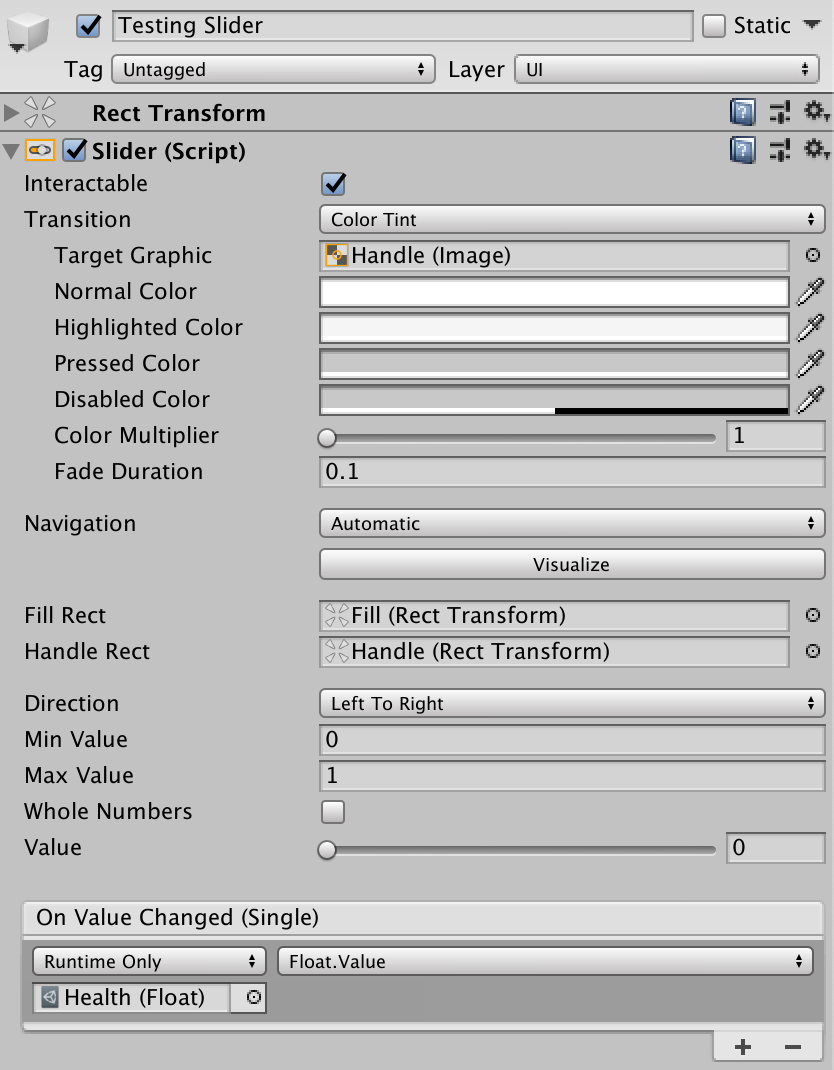
- It is as simple as pie to hook in our custom asset (On Value Change/+/Health custom asset/Float.Value)
- Run the scene and drag the slider to make the health bar change

Health Bar Integrity Testing
The integrity test loads our sample scene and exercises the slider to make sure that the health bar behaved accordingly.
  public class HealthBarTranscript : PlayModeTests {
    private static string scenePath = "Health";

    //- PlayModeTests provides a support function to make sure
    //- the scene is in the Build Settings so it can be run
    #if UNITY_EDITOR
    [InitializeOnLoadMethod]
    private static void AddSceneToBuildSettings() => AddSceneToBuildSettings(scenePath);
    #endif

    //- We will only need a single method to test the integrity
    //- of the health-bar functionality.
    [UnityTest] public IEnumerator HeathBarTests() {
      yield return LoadScene(scenePath);
      //- We will need a reference to the slider for control
      //- and the foreground to check the results
      var slider     = Component<Slider>("Testing Slider");
      var foreground = Component<RectTransform>("Foreground");
      //- Set the slider to match the health starting value
      slider.value = foreground.localScale.x;

      //- local function to set and check a health value.
      //- Note the wait. It could be one frame, but I have made it longer
      //- so we can see the test happening.
      IEnumerator setAndCheck(float health) {
        slider.value = health;
        yield return new WaitForSeconds(0.1f);
        var scale = foreground.localScale.x;
        Assert.AreApproximatelyEqual(health, scale);
      }

      //- Check bounds
      yield return setAndCheck(0);
      yield return setAndCheck(1);
      //- Ramp up and make sure all matches
      for (float health = 0; health <= 1; health += 0.05f) yield return setAndCheck(health);
      //- Now let's do some random ones
      //- in case change of direction can be a problem.
      for (int i = 0; i < 20; i++) {
        yield return setAndCheck(Random.Range(0f, 1f));
      }
    }
  }
Health Manager
In this context, a manager is logic (code) with a single concern (a data item). If that concern is not directly visual or player interactive then it is best served with a custom asset. By limiting I/O to some extremely simple and stupid MonoBehaviours, we can test almost all of the game components in isolation or groups as needed.
To allow adequate testing of custom asset managers, they should not be coupled with each other or the Unity framework. We accomplish everything with custom assets and observers.
Following the single responsibility principle, each manager should be small and focused. In this case, the health manager manages the permanent improvements to health over time.
- A manager needs the code because it holds game logic
//- Custom assets must be created to physical files in the project.
//- We could have more than one.
[CreateAssetMenu(menuName = "Managers/Health"), Serializable]
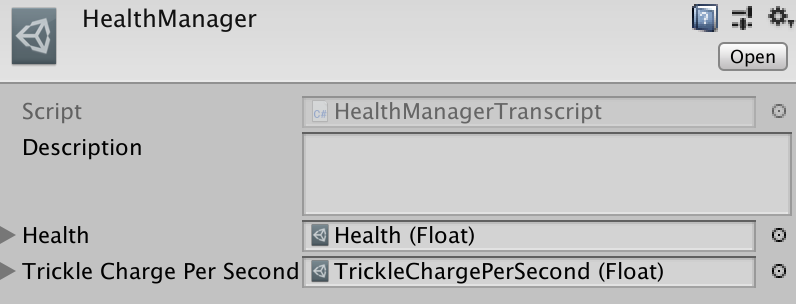
public class HealthManagerTranscript : Manager {
//- The field we are managing
[SerializeField] private Float health = default;
//- Health will slowly increase over time.
//- A permanent game ability could change this value
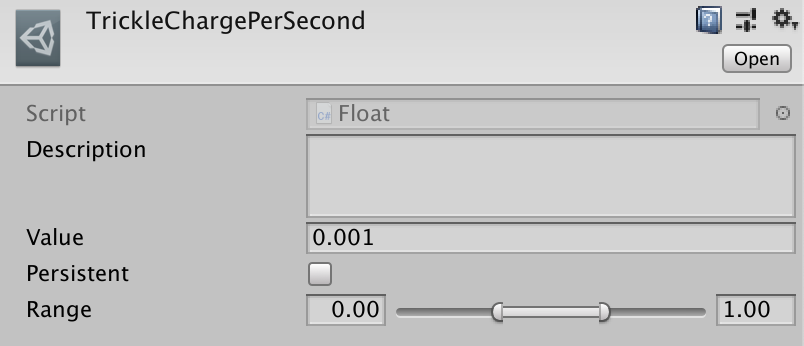
[SerializeField] private Float trickleChargePerSecond = default;
protected override void Initialise() {
base.Initialise();
//- We can just update health every second.
//- Float corrects for health over the maximum
void trickleCharge(Fiber fiber) =>
health.Value += trickleChargePerSecond;
//- Fibers are efficient, only waking once a second to update health value
Fiber.Start.Begin.WaitFor(seconds: 1.0f).Do(trickleCharge).Again.Finish();
}
}
- Create a new Float custom asset and call it TrickleChargePerSecond.
- Create a health manager with the menu or context menu Assets // Create // Manager // Health. Fill custom asset references with Health and TrickleChargePerSecond custom asset references.
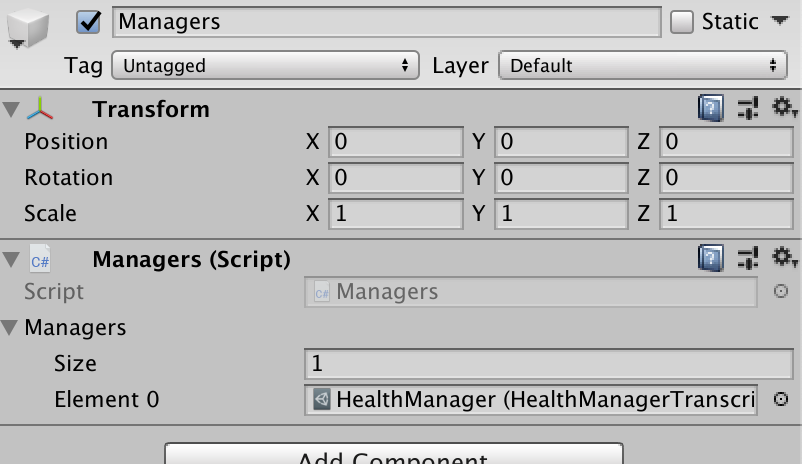
- Decoupled Managers need to tell our game that they exist. Create a game object from the GameObject/Create Managers menu and drag a reference to your manager into it. It only needs to be done in your opening scene.
- All other health changes can be made using
CustomAsset.ChangeOverTimeinstances.
Health Manager Integrity Testing
Managers do not need a scene to run, but they do need one for Fibers. They use UnityTest but do nothing visual. We could take this further by making sure that the increase in health matches the trickle charge per second value.
//- While Fibers do not need to run from a MonoBehaviour,
//- they still need a running scene - so we use UnityTest
public class HealthManagerTest : PlayModeTests {
//- The Timeout attribute uses Time.timeScale.
[UnityTest, Timeout(100000)] public IEnumerator HealthManager() {
  //- Our health component will take 1,000 seconds
  //- to go from zero to full. Let's speed things up by 10x
  Time.timeScale = 10;
  try {
    //- We don't need a specific scene, just load the custom assets
    Manager.Load<HealthManagerTranscript>("HealthManager.asset");
    var health = Manager.Load<Float>("Health.asset");
    //- Set to 0 since once a custom asset is loaded in the editor
    //- it stays loaded
    health.Set(0);
    //- It looks like forever, but the Timeout attribute
    //- will cause a test failure after 10 seconds
    while (true) {
      //- This causes a 1/10th of a second delay due to the modified scale
      yield return new WaitForSeconds(1.0f);
      //- Leaving once the test passes is a successful result.
      //- This should take 1 second at the current time scale.
      if (health >= 0.01f) yield break;
    }
  } finally {
    //- reset the time scale for other tests.
    Time.timeScale = 1;
  }
}
Refactoring to use Custom Assets
Below is a typical game manager MonoBehaviour for a 2D game. Usually, I wouldn’t refactor a working system. Whenever I need to fix a bug, add a feature or make a performance improvement, I refactor the relevant code.
For example, if I needed to update KillPlayer I would factor it out into a death manager and leave everything else as-is. If I were a good boy (and I am), I would write an integration test to go with it. The actual work would be minimal, and the stability gains for future changes makes it all worth-while.
The Original Code
public sealed class GameManager : MonoBehaviour {
  public static GameManager Instance { get; private set; }

  public int Lives { get; private set; }

  public event Action<int> OnLivesChanged;
  public event Action<int> OnCoinsChanged;

  private int coins;
  private int currentLevelIndex;

  private void Awake() {
    if (Instance != null) {
      Destroy(obj: gameObject);
    } else {
      Instance = this;
      DontDestroyOnLoad(target: gameObject);
      RestartGame();
    }
  }

  public void KillPlayer() {
    Lives--;
    if (OnLivesChanged != null) OnLivesChanged(Lives);

    if (Lives <= 0) {
      RestartGame();
    } else {
      SendPlayerToCheckpoint();
    }
  }

  private void SendPlayerToCheckpoint() {
    var checkpointManager = FindObjectOfType<CheckpointManager>();
    var checkpoint        = checkpointManager.GetCheckpointThatWasLastPassed();
    var player            = FindObjectOfType<PlayerMovementController>();

    player.transform.position = checkpoint.transform.position;
  }

  public void MoveToNextLevel() {
    currentLevelIndex += 1;
    SceneManager.LoadScene(currentLevelIndex);
  }

  private void RestartGame() {
    currentLevelIndex = 0;
    Lives             = 3;
    coins             = 0;
    if (OnCoinsChanged != null) OnCoinsChanged(coins);
    SceneManager.LoadScene(sceneBuildIndex: 0);
  }

  public void AddCoin() {
    coins++;
    if (OnCoinsChanged != null) OnCoinsChanged(coins);
  }
}
Change Summary
InstanceandAwakeare removed as not necessary since once we refactor all the codeLives,coinsandcurrentLevelIndexbecomes aCustomAsset.IntegerOnLivesChangedis provided by the custom assetLives- no code requiredOnCoinsChangedis provided by the custom assetCoins- no code requiredKillPlayeris absorbed into the manager custom assetPlayerDeathManagerSendPlayerToCheckpointis absorbed into the manager custom assetPlayerDeathManagerMoveToNextLevelbecomesscene.Value += 1RestartGamecould become aCustomAsset.TriggercalledRestartManagerAddCoindisappears and logic accesses theCoinscustom asset directly.
PlayerDeathManager
  [CreateAssetMenu(menuName = "Managers/Player Death"), Serializable]
  public class PlayerDeathManager : Manager {
    [SerializeField] private Float      health       = default;
    [SerializeField] private Integer    coins        = default;
    [SerializeField] private Integer    lives        = default;
    [SerializeField] private Integer    maximumLives = default;
    [SerializeField] private Integer    scene        = default;
    [SerializeField] private GameObject player       = default;
    [SerializeField] private GameObject checkpoint   = default;

    protected override void Initialise() => health.Emitter.Subscribe(OnHealthChange);

    private void OnHealthChange() {
      if (health <= 0) KillPlayer();
    }

    private void KillPlayer() {
      if (lives <= 1) {
        RestartGame();
      } else {
        SendPlayerToCheckpoint();
      }
    }

    private void RestartGame() {
      scene.Value = 0;
      lives.Value = maximumLives;
      coins.Value = 1;
    }

    private void SendPlayerToCheckpoint() => player.Value.transform.position = checkpoint.Value.transform.position;
  }
SceneManager
  [CreateAssetMenu(menuName = "Managers/Scene"), Serializable]
  public class SceneManager : Manager {
    [SerializeField] private Integer scene = default;

    protected override void Initialise() => scene.Emitter.Subscribe(OnSceneChange);

    private void OnSceneChange() => UnityEngine.SceneManagement.SceneManager.LoadScene(sceneBuildIndex: scene);
  }